I hate my floors. There, I said it. I mean, they’re brand new and we chose them and we oversaw the entire thing, but I hate them. They’re too… grey. And tiled. And just grey tiles. Gross. So I’m on a mission to cover them up in the most affordable way possible and this DIY Rope Coil Mat is one such way to distract from the eyesore that is our flooring.

After spending wa-haaay too much money on absurd rentals for tiny little matchbox apartments in Cape Town Central, we were fortunate enough to find a very affordable plot out in the Northern wine valley of Cape Town where we got to build our very first, brand new house! It all sounded like a dream, getting to build and design our own dream home, but in reality – and with all building projects – we were in for a steep incline of stress, shitty contractors and, despite the irony, too many uncomfortable months of perpetual homelessness. But the house build is a post for another time… The point here is, I didn’t get the floors I wanted and I scorn them every time I see them. ‘Damn you, floor!’ I say every single day as I sweep (and sweep and vacuum and sweep) all the dog hair in the land. I try to be accepting and tolerant, but these fugly tiles… Nope.

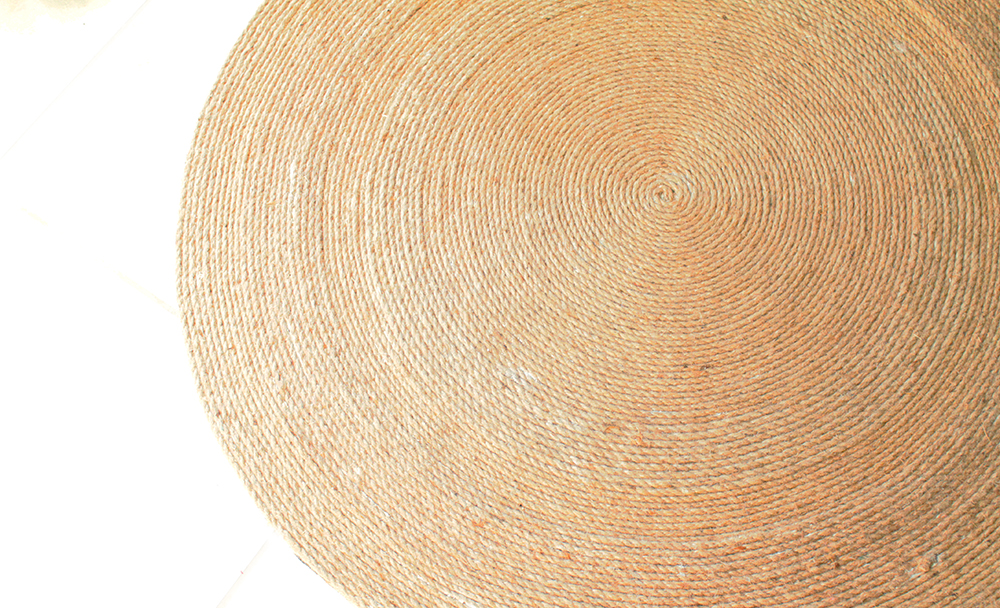
My little entrance coming along slowly…
But I digress. This mat is a very simple and popular idea I saw on quite a few Pinterest pages, but the one I loved the most was from the ever so lovely A Pair and A Spare. I loved the simplicity and the fact that I could do this on the cheap in barely any time at all! Here’s how you do it:

MATERIALS
100m of 17″ natural fibre rope
2 x tubes of No More Nails
caulking gun
large heavy duty drop sheet
craft knife
INSTRUCTIONS


01. Spread out your drop sheet. Using the caulking gun, dab a small dot of glue in the centre of the drop sheet. Taking the rope, form a tiny coil in your fingers and press down onto the glue for a few seconds to allow it to take hold.


02. Working from the centre outwards, continue to glue and press down the rope in stages until the circle is as big as you like. This is a slow process so get comfy, catch up on some shows and get gluing! It helps to angle the glue so it touches both the rope and the drop sheet to create an even tighter bond – . If you look closely you can see my mat has a few white spots of glue here and there – you can try smooth it out before it dries, or allow the glue to dry and then cut off with a craft knife.

03. When you get to the end, trim the rope neatly and glue in place, or if you prefer, you can tuck the end piece under and out of sight. Allow the whole mat to dry properly, about 24 hours.

04. When it’s bone dry, cut off the remaining drop sheet with a craft knife and neaten up any visible bits. And that’s it! A brand new rope coil mat! You can always add some non-slip felt stickers underneath, but it’s quite heavy as is and shouldn’t move.
NOTE: I know 100m sounds like a crazy amount of rope, but I started with 30m and had to keep adding and adding because you don’t actually get very far with concentric circles. 100m got me to about 1,5m in diameter so if you’d like yours to be bigger, then add some more rope and see how you go :) this really is a customisable project.

Even Beanie the Collie got in on the mat making action…

One day when we’re rich we’ll redo the floors (…hint hint, husband) with a blonde parquet or pressure treated concrete (swoon!). But for now at least I have one tiny area of my entrance where I don’t have to burn my eyes on those ugly af floors. Rope coil mat to the rescue! Woop.
Happy making, everyone!
♥ Dani
Pingback: Sweet Inspiration Link Party #40 - Repurposing Junkie
I love it!! And I hate my floors too! I had no idea it would be so easy to make this! It looks fantastic! I have rugs and carpets all over our house because we don’t have grey tiles, but beige ones! And they are just so horrible and it gets so cold now in the winter too! So this is a perfect and affordable solution!
I love it so much I’ll be featuring it at this weeks Sweet Inspiration going live on Friday!
Ah Katrin, that is awesome! Yay! So glad you liked it :)
I’m so glad you like Katrin, and also I feel your pain on the flooring. Urgh. Let me know if you make the rug – it’s pretty durable and that’s with three crazy dogs running all over it! :) x
So creative! I grew up seeing those mats and never thought it could be something g so simple to do. As for the grey tiles… they don’t nearly as bad on the photos! But, I do know that feeling when you choose something, costs you a fortune, have it installed, and you absolutely hate it. That normally happens to me when I go ahead with out the hubby’s approval… and then I never have the guts to admit just how much I hate it!! Lol. I hope these somehow grow on you, or you keep finding creative ways to make them not stand out so much.
http://www.thebeautyboffin.blog
They’re SO simple Tendai! You have to try it :) I’ll definitely need to find more ways to cover them tiles – ughhh! Who knew carpets were so expensive??
Congrats on the new house Danni and oops about the floors. That’s a bummer. It would irrate the crap out of me too. Your coil mat looks great though and it seems really easy to do. I must try it sometime
Thank you Michelle :) it’s ok – one day we’ll replace them!