You guys! I am so in love with this new project! It’s everything I love about DIY – it borrows conceptually from an existing expensive product and makes it cheap as chips, it took me about an hour to complete from start to finish and it’s so damn stylish no one will guess its a DIY to begin with! Squeee! And a Faux Marble Jewellery Display is just what I needed to help me move on from the disaster that is my jewellery box.


One of the best things about this project is that literally anybody can do this. Like, anyone. I’ve never used polymer clay before – it was always the stuff of my childhood intrigue, staring at the rows and rows of tiny polymer characters at the craft market, wondering how on earth these tiny bits of wonder were made. I never anticipated being keen on it in my adulthood, but here it is in all it’s super-trendiness and I couldn’t be happier!
This is so simple you won’t even believe me til you try it yourself.
DIY FAUX MARBLE JEWELLERY DISPLAY
MATERIALS
Polymer Clay in White and Black
Bamboo Skewers
Wood Glue
Rolling Pin
Xacto Knife
INSTRUCTIONS


01. Roll out about half a block of your white polymer clay until it’s soft and malleable (apparently people in the polymer-know call this ‘conditioning’). Do the same with a small ball of the black polymer clay. Once these are both nice and soft, combine a tiny bit of black with a small amount of the white to mix into a light grey. Once you’re happy with the grey, add this to another big ball of white and spread gently to marble it. Don’t spread it too much or you’ll lose the effect.


02. Roll out your marbled clay to about 0.5cm thick and cut into a rectangle. Using the flat end of a bamboo skewer, make a hole on either end of the rectangle. Remove the skewer and bake the clay for 40 mins in a 130ºC oven.

03. While the clay is baking, prepare your bamboo skewers. Cut two full lengths, chopping them off right beneath their points. With another skewer, cut a length to reach across as the bar and mark 4 equidistant points between the points of attachment. It should have an overhang of about 2cm on either side. With the remaining part of the cut off skewer, cut 4 small lengths of about 2cm each. These will be the pegs to hang your jewels from.

04. Once your clay is baked and cooled, add a dot of wood glue to each hole and insert the two longer skewers into each one. Allow to dry.

05. Glue your bar across the two lengths and allow to dry. It’s easier to do this if you lie the stand on it’s side. In the pic above you can also clearly see my red marks for the peg placements.

06. Now it’s time to practice your patience (not a strong suit of mine)… Attach the short pegs one by one by holding them in place. They take a little bit of time by once they’re dry they’re super strong so don’t stress (have you seen how huge my rose quartz necklace is?? That thing is mad heavy!). Allow all your joins to dry properly before adding on any jewels.
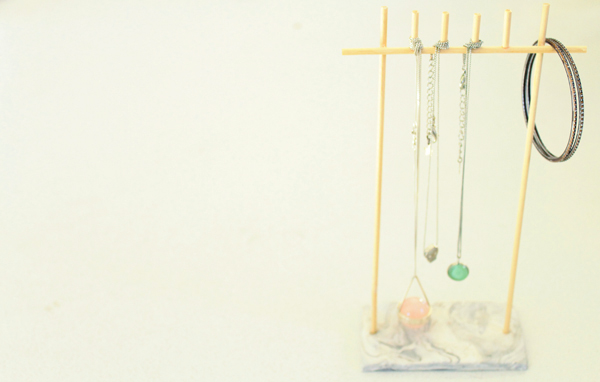
And that’s it! How cute and easy is that?? A brand new faux marble jewellery display to show off all your precious gems in no time flat. I think I’ll be making a few more of these in different lengths and sizes for all my old rings, earrings and bangles :) Now I feel the sudden need for more jewellery….


Happy DIY-ing!
♥ Dani
Pingback: DIY Faux Marble Ideas to Get Feeling of Nobility and Elegance - GODIYGO.COM
Pingback: 16 Genius DIY Projects Making Use of Faux Marble Finishes - Model X
Pingback: 14 Modern Marbling Techniques to Try - Hobbycraft Blog
It came out great!! Love the effect you got with the different colours, it looks just like marble.
Thank you! Polymer clay is amazing – the options are endless and it really does take on a realistic effect. Glad you approve :)